Unify - Siemens - OpenScape Buisness - IP Connection
These instructions help you configure your Unify OpenScape Busines phone system to work with TIM Enterprise. Contact your system maintainer if you are not familiar with the configuration of your PBX.
Support files
Ensure the following support files exist in the /config/ folder of the TIM Enterprise application:
Unify OpenScape Business.TDT
Unify OpenScape Business.TDS
Contents
Configure the SMDR output
info
You may need to purchase a license to enable SMDR on this PBX. Please speak to your system maintainer if you are unsure.
Enabling the SMDR output
Follow the instructions below to configure the SMDR output in your phone system. These instructions are taken from the Unify OpenScape Business manual:
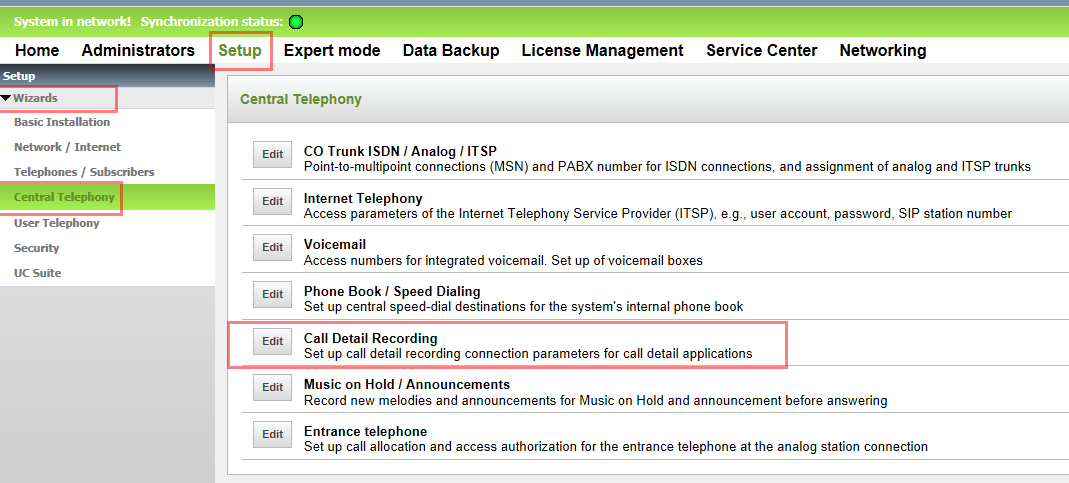
Log on to OpenScape Business Assistant and click on Setup -> Wizards -> Central Telephony, as shown below:

Click Edit to start the Call Detail Recording wizard.
In the new window that opens, tick the Activate Call Charge Recording to enable the CDR output, as shown below:
Sending the SMDR via TCP/IP
By default, the Unify OpenScape Business phone system send its SMDR output via HTTPS. To send the data via a TCP/IP, follow the steps below:
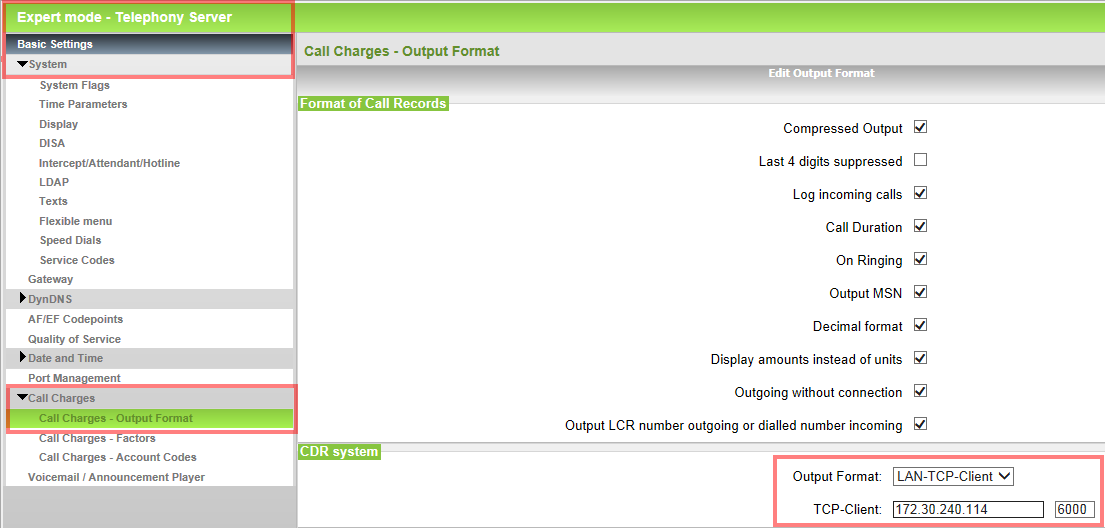
Log on to OpenScape Business Assitant with Expert profile
Click on Telephony Server -> Basic Settings in the navigation tree
Click on Basic Settings -> Call charges -> Call charges output format
In the CDR system section, select LAN-TCP-Client from the drop-down list
In the TCP-Client field, enter the IP address of the PC running TIM Enterprise and the port number you want to use for the SMDR output, as shown in the screenshot below:

info
Please note the following:
- If the system was upgraded from HiPath 3000 using the convert tool, the data format will use ; as a separator
- If the system was upgraded from HiPath 3000, but the database was retyped subsequently, the data format will use | as a separator
- If the system was new, the data format will use | as a separator
If the HiPath 3K database was simply converted and not retyped, no change will be required, since both the old and the new database will use ; as a separator. If the database was retyped, the new platforms default to |separator. This is the most notable in a networked environment where the same template must be used.
However, the | separator cannot be set in the new WBM tool, and can only be configured using the Manager E, as shown below:
![output format](img/unify_openscape_business_IP_2.png
Configure The TIM Enterprise
Follow the steps below to configure TIM Enterprise to connect to your Unify OpenScape Busines :
Click on the
Directorytab.If you don't have a PBX object, press
New objectand selectPBX. Name your site and then selectAdd. Locate the PBX object you want to configure in the Directory, click on it and selectProperties.A new window will open, displaying the general properties of your PBX object. Select Unify OpenScape Busines from the Data format list and tick the Keep a local backup of data box, as shown below:
![TIM Enterprise PBX General Properties]
Click on the
Connectiontab and select connection method from the Connection method list.In the Host field, enter the IP address of your telephone system.
In the Port field, enter portnumber.
Leave the Username and Password fields blank.
In the IP script field, select Unify OpenScape Busines from the drop-down list.
![TIM Enterprise PBX Connection Properties]
Click on the
Savebutton to apply the settings.